
Injection nipples: connection, valve and installation
Match the nipple head to the coupler, valve opening pressure to the delivery method and thread seal to the packer body.
Deliver material first. Then prevent backflow.
Start at low pressure
Opening at approximately 6 bar lets injection start without building high pressure simply to overcome valve resistance.
The valve closes the return path
When material pushes back from the structure, the non-return valve should stop discharge through the nipple. Check for leakage from the valve after disconnecting the coupler. Leakage at the thread or around the packer indicates a different sealing issue.
More than lost resin is at stake
A tight valve limits backflow through the packer after the coupler is disconnected. It helps retain material and pressure in the injection zone.
What does a “low” opening pressure mean?
A valve with a high opening threshold first requires the spring resistance to be overcome. A threshold of approximately 6 bar makes it easier to start delivery under control at low pressure.
Where the application requires spring resistance to be eliminated, we develop a springless steel nipple solution. We also use springless valves in all plastic packers fitted with plastic nipples.
Three pressures that should not be confused
- Valve opening: the point at which material begins to pass through the nipple.
- Pressure during delivery: depends on the measurement point, system losses, material and resistance within the structure.
- Back pressure: pressure from the injected area after delivery stops.
Start at a low pressure suitable for the injection task. Increase it while observing delivery and the substrate's response, within the system's operating limits.
Professional versions and ECO
SWG, PRE, FWG and FPRE provide solutions for work requiring reliable non-return sealing. The economical ECO nipple may leak with low-viscosity materials. Keep the valve seat clean in every version.
Geometry and thread finish.
Conical connection. Select a compatible conical coupler and check whether the nipple is supplied fitted or separately.
Conical or flat-head? Choose a connection that matches your coupler.
| Version | Coupler connection | Practical difference | Opening pressure |
|---|---|---|---|
| SWG | Conical | Professional non-return nipple. Check whether it is supplied separately or pre-fitted. | approximately 6 bar |
| PRE | Conical | Thread with a factory-applied sealing coating; version intended for observing material transfer and venting. | approximately 6 bar |
| FWG | Flat-head | Requires a compatible flat-head coupler. The passage in the M6x1 example differs from the conical version. | approximately 6 bar |
| FPRE | Flat-head | Flat-head version with a factory-applied thread-sealing coating. | approximately 6 bar |
| ECO | Depending on the specific version | Budget version; may leak under back pressure with low-viscosity materials. | approximately 6 bar |
Opening pressure is not the packer's maximum pressure
Approximately 6 bar is the valve opening threshold. Check the maximum working pressure for the selected packer.
The coupler must match the nipple
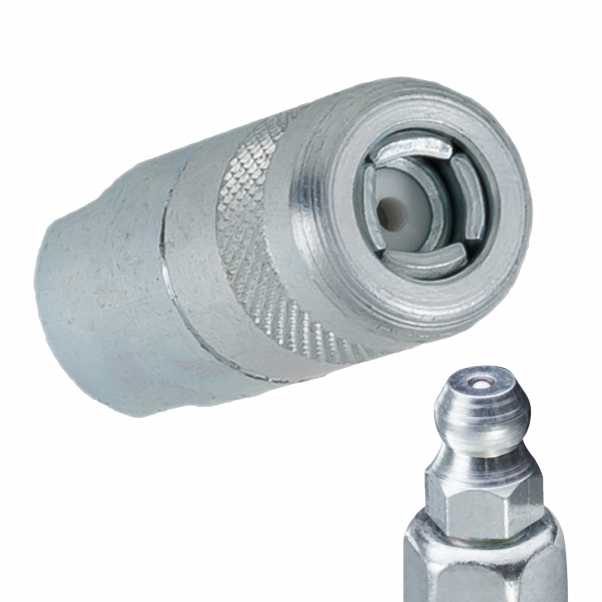
- SWG/PRE conical connections: select a compatible CPX or CPX-T four-jaw coupler for the model.
- Flat-head connections: select CPF/CPF-UP or CPC to match the nipple head size.
- Check the jaws, seals and spring components of the coupler separately for wear.
Check the permitted working pressure for the specific CPF coupler model. Also assess secure attachment and component condition.
CPX or a flat-head coupler? The difference in everyday use.
Both couplers connect the hose to the nipple, but attachment, handling and removal differ. Your choice affects convenience during short injections and longer delivery at one point.
CPX / CPX-T — quick connection
Push the four-jaw coupler onto the conical nipple. It suits frequent moves between injection points.
At the start of delivery, keep the coupler in line with the nipple until pressure stabilises the connection. Supporting the coupler and handling the hose gently reduces misalignment and strain on the joint.
CPF / CPF-UP — hands free during longer injections
Slide the coupler sideways over the flat nipple head until fully seated. Once correctly fitted, it does not need constant support in line with the packer.
This is convenient for longer injection at one point: you can operate the pump and observe material flow without continuously holding the coupler. Removal can be harder at higher pressure: depressurise the hose before disconnecting.
Match the connection method to your workflow
Frequent changes of injection point: CPX / CPX-T makes quick connection easier. Longer delivery at one point: CPF / CPF-UP provides a convenient connection without continuously supporting the coupler.